a trEATs affair

treats, travel & eats

  • Home
  • Baking
  • Cooking
  • Tutorial
  • travel
  • Meet Roxana
    • About a trEATs affair
    • Contact
  • Work with me
  • Ask a question
  • Recipe request
  • Privacy Policy
    • Disclosure policy
  • Home
  • Subscribe
  • Meet Roxana
    • Contact
  • Work with me
  • Baking
  • Cooking
  • Tips
  • travel
  • Ask a question
  • Recipe request

Baking Bread 101 – Equipment

January 9, 2013 by Roxana 41 Comments

Before I begin this 4 posts series I want to say I’m not compensated by any of the companies I’m going to refer to, not was I given free products. I’ve never taken bread baking classes or any baking classes. Everything it’s from my own experience.

bread baking 101

I get a lot of questions about homemade bread. From why mine is not as yellow/white as yours? Why not so soft and fluffy? What brand of flour are you using? Once someone even asked about my oven. Since this year I’ll be hosting Bake your own bread I though I should start by sharing my knowledge about home bread baking. Plus, in my monthly series Behind the Apron I promised I’d talk about bakeware, ingredients and all the mess behind the photos.

There will be 4 posts as part of this series.

Bread Baking 101 – Equipment

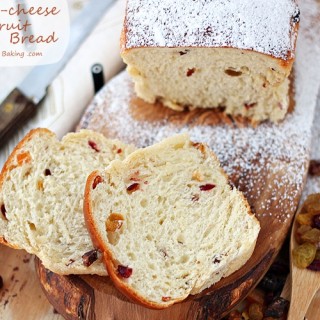
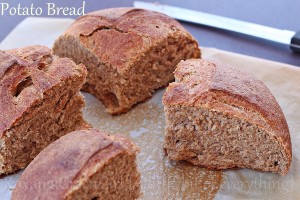
Bread Baking 101 – Commonly used ingredients : water, salt, sugar, milk, butter, oil, eggs

Bread Baking 101 – Commonly used ingredients : flour 

Bread Baking 101 – Commonly used ingredients : yeast


If you have any questions, please leave them in the comments below.

Today we’re going to talk about equipment. 

The first on the list is the Oven. I have an electric double wall oven. I grew up with a gas oven and I remember when I was a kid my grandma used her stone oven. It doesn’t matter what kind of oven you have, what matters is to know your oven.

The first thing you need to do is find out if your oven bakes evenly.

To test your oven heat the oven to 400F. Place the rack in the middle of the oven. While the oven is heated cut enough bread slices to cover a baking sheet as big as your oven. Bake the slices for 15 minutes. Take them out and if in some areas the slices are darker (one of mine is in the back left corner) your oven doesn’t bake evenly. Unfortunately I don’t know a cure for this uneven baking, my only advice is to try remember to rotate the baking sheet at half-time or to avoid completely baking in that corner (use a smaller baking sheet, bake twice instead of everything in one round).

Calling the oven manufacturer might help, haven’t done that. Can’t say much.

Another step in knowing your oven is to know if the temperature is accurate, step that leads to the second piece of equipment – Oven Thermometer.

To check if your oven is calibrated you have to run a couple of tests.

Place the  thermometer on the rack positioned in the middle of the oven. Set your oven to heat to 300F. Let the oven on for 30-35 minutes without opening the door. Now open the door and read your thermometer. Does it reads 300F? If it does you’re in luck, if it doesn’t write down the temperature shown on the thermometer.

Now set the oven to 350F. Without opening the door let the oven heat for another 30-35 minutes. Open and read again the thermometer. Is it the same temperature difference? Write it down.

Close the door and set your oven to heat to 400F. Open the door after another 30 minutes and check the temperature.

Most oven have the same temperature difference (usually +\- 25F) no matter how hot you heat up your oven.

Keep in mind these notes every time you bake something. We want to be successful, don’t we?

bread baking 101 equipment 1

 And taking about successful baking, another “must-have” kitchen gadget is the Digital Scale.

I own a Cuisinart Digital Scale and had it for over 2 years now. It’s been used and re-used and I don’t know what I’d do without it.

I use it for almost every dry ingredient (except salt/pepper/spices) and sometimes even for wet ingredients like butter, sour-cream, yogurt and few others. Using a digital scale is the most accurate measuring system ever. I prefer weighting in grams but if you prefer you can use ounces. Most of the digital scales come with the option of reading both in grams and ounces. All you have to do is set it up by pressing the tare button. Also the tare button lets you reset the scale to zero after you placed an empty bowl on it or added some of the ingredients.

To test if your scale is accurate weight a stick of butter or a chocolate bar (without the wrapping). A stick of butter should read 113 grams and the weight of the chocolate bar you’ll find it on the wrapping.

For measuring ingredients you can also use measuring spoons and cups. I have several sets and sizes, from a pinch to 2 cups but only use them for wet ingredients.

To make those irresistible picture perfect loaves of bread you’ll need mixing bowls and resting bowls or bannetons.

The mixer bowl, just like its name suggests is used to mix all the ingredients to form the dough. if you own a stand-up mixer, it comes with a bowl, you don’t need an extra one although I’m pretty sure most of us have plenty of mixing bowls in the kitchen.

To make the dough without a stand-up mixer you’ll need a whisk and a dough whisk (also known as Danish dough whisk). I usually use a good whisk to mix the yeast with the water and keep using it until the dough becomes thick enough for it then I switch to the dough whisk. Eventually the dough will be hard to mix with the dough whisk also and you’ll do the work with your hands, but will talk more about this in the baking bread part.

Resting/proofing/rising bowls  are used to let the dough rest at room temperature until it doubles in volume. Remember to always grease your bowl before placing the dough in it. You can also use a rising bucket or a banneton, mostly used for artisan bread.

Bannetons are baskets made from cane (cloth lined or not) that are used to proof dough for round or oval-shaped bread (country or artisan). Unlike the resting bowls, the bannetons need to be floured before you let the dough rise in it, otherwise it will stick to the bowl.

When left to rest the dough has to be covered. I prefer plastic wrap since it doesn’t allow air to get in contact with the dough drying it out. Some bakers prefer a cotton towel and for shaping baquettes a couche (I do not own one, but it’s on my wish list). It’s just a preference, you’ll have to try it out before you decide which one to use.

bread baking 101 equipment 2

Spatulas, spoonnulas or simply a wooden spoon are used to scrape the batter from the sides of the mixing bowls and from the dough whisk/hook. Also they are used to spread the filling when making rolls.

Also for scrapping the work/knead area you’ll need a bench knifes also known dough cutters. They come in different sizes, and made either from metal with a plastic/wooden handle or completely made of plastic. I have plastic one, it’s just a personal preference. With the metal ones you can cut the dough and even transfer it from one area to another.

Rolling pins are used for rolling out the dough for swirl breads, crescents, rolls, pizza crust etc.

Lame or scoring knife. For fear I cut my fingers while searching for a lame in the drawer I prefer a small pairing knife to score/cut the surface of the bread just before baking. Some find it easier to score before the last rise. I don’t think there’s a difference in the final results. The scoring is usually done for banquettes type of breads to allow  maximum expansion and also control the direction the bread will rise during baking. Artisan breads are also scored mostly to create beautiful unique patterns.

There is a difference between slashing a shaped bread before or after rising, though. If you bake heavy whole grain loaves, and score them just before baking, the cut might not open up enough to give the bread an attractive look. I score those breads always before they proof, and sometimes even twice, before and after rising. Karin of Brot & Bread

Parchment paper and silicone baking mats are used to prevent the bread from sticking to the baking sheet while in the oven. Alternately you can grease the baking sheets and sprinkle some cornmeal.

Pastry brushes are used to brush the loaves with egg wash, butter or milk. Pick a brush with soft hair.

Baking pans and sheets are used to bake the bread on or in them. Most loaf pans used in bread baking are 9 by 5 and 8½ by 4½ inch. Nowadays you’ll find loaf pans made from aluminium, ceramic (my favorite) and glass (Pyrex). Keep in mind when baking in a glass pan to lower the oven temperature by 25F. (they tend to absorb heat faster). Although I love my ceramic pans I plan on buying a Pullman pan this year.

Choose baking sheets, especially for bread baking, that are heavy gauge so they don’t warp in the oven.

Baking stone or pizza stone is a heavy flat stone that’s placed on the lowest rack in the oven to mimic the heat of a brick oven. It’s usually used fro artisan breads and pizzas. If you’d like to use one make sure you heated it up for at least one hour. Keep in mind never ever drop cold water on a hot baking stone. It will crack!

A wooden peel or baker’s peel is used to slide the loaf on the hot baking stone. It’s a thin version of the cutting board with a wooden handle. I do not own a baker’s peel per-se since it’s quite big, but I found a light wooden cutting board that does a great job.

Cooling racks are used to properly cool a loaf of bread. Usually bread is left 3-5 minutes in the baking pan and then removed and left to cool on a baking sheet. if you leave the bread to cool completely in the pan and even on the baking sheet, the bottom crust with sweat making it sort of soggy.

Wooden cutting board and serrated knife.  Time to finally enjoy a slice of bread! For a great slice always use a serrated knife and cut the bread with a sawing motion.

bread baking 101 equipment 3

I didn’t mention a stand-up mixer because you can definitely make bread without one. I’ve done it and still do, although the mixer is a time saver since I can do other things while it kneads the dough.

Except the Pullman pan and couche I mentioned earlier I plan on buying an oval banneton (this time maybe try a cloth lined one), this brick oven and (fingers crossed) upgrade to a 7 quart Kitchen Aid stand up mixer.

~~~~~~

Sending love your way,

Roxana

Related Posts:

  • Greek Easter bread – Tsoureki
  • 10 chocolate recipes you must try before you die
  • Chocolate banana bread pudding with chocolate sauce

Filed Under: Tutorial Tagged With: behind the apron, bread, bread baking 101, bread baking equipment, tutorial

About Roxana

Roxana has a passion for all things food, a sweet tooth that can’t be tamed and a severe case of the wanderlust
With an audience in search for real food and no fuss recipes, I make midweek meals exciting sharing approachable recipes, both sweet and savory, that taste completely sinful.

« Chocolate coconut cookies
Cheese pizza with homemade pizza dough »

Search

Categories

Archives

Comments

  1. Stephanie @ Girl Versus Dough says

    January 9, 2013 at 8:24 am

    What a FANTASTIC series, Roxana! Even as someone who's been baking bread for several years now, you've got some great tips I never knew about. Can't wait to keep following along!
    Reply
  2. Carol | a cup of mascarpone says

    January 9, 2013 at 8:41 am

    Thank you, Roxana! Love this series!
    Reply
  3. Kayle (The Cooking Actress) says

    January 9, 2013 at 9:05 am

    Looooooove this!
    Reply
  4. The Mom Chef says

    January 9, 2013 at 9:55 am

    Outstanding! FYI, I think you need to make this series available via e-book for a couple of bucks on your site when you're done. It's outstanding information and something folks would want to be able to access again and again.
    Reply
  5. Anusha says

    January 9, 2013 at 11:09 am

    Hey Roxana that s a very informative post . Kudos to you and i ve never heard of the banneton but learnt something new today....... looking forward to read more on this from you
    Reply
  6. dixya @ food, pleasure, and health says

    January 9, 2013 at 12:01 pm

    i cant thank you enough for this bread series because I had been wanting to bake breads for so long. I did few here and there but I want to learn from the basics and your series will probably help answer most of my queries. So excited! you just made my day :)
    Reply
  7. Laura (Tutti Dolci) says

    January 9, 2013 at 12:20 pm

    I love this series idea, Roxana! I've baked bread but still have much to learn. Can't wait for the next post! :)
    Reply
  8. Kankana says

    January 9, 2013 at 12:21 pm

    Beautiful post and so very informative! It's only from last year that I started baking breads at home and while at times it comes out perfect, other times it's a complete failure. I am sure these posts of yours will be a huge help.
    Reply
  9. Priscilla | She's Cookin' says

    January 9, 2013 at 1:19 pm

    Great idea and I think The Mom Chef is right - you should do an ebook. Very informative series for all of us nonbakers - I've been meaning to buy a scale for some time, must do asap :)
    Reply
  10. Erin @ Dinners, Dishes and Desserts says

    January 9, 2013 at 1:31 pm

    What great tips! Bread is so intimidating for some people, this is a great post. Looking forward to the rest of the series!
    Reply
  11. Inga says

    January 9, 2013 at 1:45 pm

    OOOH! I'm so exited to learn new tips! I am a newbie to bread making and am quickly becoming obsessed with bread! :) Have you tried to bake your bread in a dutch oven in the oven? It makes crunchy, chewy bread! (one of my faves!) I'm quickly learning it is the environment the bread needs to make yummy, happy bread! Thank you for your your tutorial!
    Reply
    • Roxana says

      January 9, 2013 at 3:52 pm

      Hi Inga, I've eaten a couple of times bread baked in a Dutch oven but have never made my own. Roxana
      Reply
  12. Susan says

    January 9, 2013 at 1:46 pm

    This is an incredible list! I'm looking forward to the rest of your series!
    Reply
  13. Kate | Food Babbles says

    January 9, 2013 at 4:28 pm

    What a fantastic post! I'm pretty new to baking my own bread and this series is sure to be full of fantastic information. Also excited that you'll be hosting Bake Your Own Bread this year! I just discovered it two months ago. Love it and can't wait for the next 3 posts in this series!
    Reply
  14. Maureen | Orgasmic Chef says

    January 9, 2013 at 6:12 pm

    Great series and I know I'll pick up tricks I didn't know before. I love making bread!
    Reply
  15. Matt Redden says

    January 9, 2013 at 7:55 pm

    Just a thought about baking with a gas oven - one of the byproducts of propane or natural gas combustion is H2O vapor. This may or may not impart a different quality to the crust. If you suffer from a horribly uneven oven, you can consider using a pizza stone or other thermal ballast (maybe gas grill briquettes) in order to radiate heat from cooler corners of your oven. Just remember to get everything good and warm for more than an hour first.
    Reply
  16. Lemons & Anchovies says

    January 9, 2013 at 10:29 pm

    An oval banneton is on my wishlist, too. I love my two round ones. Such great tips, Roxana. I'm comfortable baking bread now but I still enjoyed reading your post. There's always something new to learn. Looking forward to the rest of the series.
    Reply
  17. Suzanne says

    January 10, 2013 at 12:13 am

    Love the equipment here and the photos are beautiful Roxana. Looking forward to the rest of the series. xoxox
    Reply
  18. Radhika says

    January 10, 2013 at 7:50 am

    That's a load of info Roxanna. Thank you for sharing. One question though, I have a Microwave Convection Oven. It would be helpful if you could explain about its feature also and the difference it will make from baking in the regular oven.
    Reply
    • Matt Redden says

      January 11, 2013 at 9:29 pm

      Does the manual give any useful advice for baking bread with it?
      Reply
    • Roxana says

      January 12, 2013 at 8:15 pm

      Hi Radhika, wish I knew the answer to your question. Unfortunately I don't own a Microwave Convection Oven and the only use I know for microwave is to heat up coffee :(
      Reply
  19. vianney says

    January 10, 2013 at 9:19 am

    Great series Roxanna!! I really want to bake more bread this year. Looking forward to your next post.
    Reply
  20. Karin Anderson (Karin's Bäckerei) says

    January 10, 2013 at 9:28 am

    A very nice and informative post for bread baking newbies. There is a difference between slashing a shaped bread before or after rising, though. If you bake heavy whole grain loaves, and score them just before baking, the cut might not open up enough to give the bread an attractive look. I score those breads always before they proof, and sometimes even twice, before and after rising. I would not recommend using a normal pizza stone. They are thinner than baking stones for bread, and will crack soon, if you bake at higher temperatures, even if you are very careful. In some home improvement stores you can still buy unglazed quarry tiles. I use those for many years already, and they work great. Happy Baking!
    Reply
    • Roxana says

      January 10, 2013 at 6:45 pm

      Hi Karin, Thanks for the info. I'll update my post and quote you in it. I haven't seen unglazed tiles, truth be told I've never even looked for them. I was happy with my pizza stone until I broke it just before the holidays. Will have to do some researches. Thank you!
      Reply
    • Matt Redden says

      January 11, 2013 at 9:25 pm

      Actually... if you want to be resourceful, you can reuse a broken pizza stone in much the same way. If you can get it to fracture into useful size pieces you can use it for ballast in the bottom of the oven.
      Reply
      • Roxana says

        January 11, 2013 at 10:55 pm

        If i try to reuse it it would be a lot of extra work since I bake lots of other sweet treats and can't leave the stone in the oven. I'd rather buy a new one, easy to put in and out of the oven when needed
        Reply
  21. Wendy @ La Phemme Phoodie says

    January 10, 2013 at 11:31 am

    This is a great idea for a series! My bread baking skills are severely lacking. Looking forward to your posts.
    Reply
  22. cakewhiz says

    January 10, 2013 at 12:15 pm

    this was a very informative post roxana! i am looking forward to following your mini series and learning so much more :)
    Reply
  23. RavieNomNoms says

    January 10, 2013 at 3:17 pm

    What a great post! I just love it!
    Reply
  24. Stephanie says

    January 10, 2013 at 4:14 pm

    Thank you so much for this series! This will be the year that I plan on baking bread and this is extremely helpful!!
    Reply
  25. Nisha says

    January 10, 2013 at 6:25 pm

    wow. excellent, excellent post. keep 'em comin!
    Reply
  26. Gaby says

    January 11, 2013 at 11:41 pm

    Hello I have a big question I used to bake my bread perfectly I was living in Utah then we came back to Monterrey Mexico the question is these I been trying to bake I can't the wound rise at the moment they are baking I think it could be because of the altitude but Icahn adjust it could you help me? Monterrey is a 1765 feet sea level I'll appreciate you help.
    Reply
    • Roxana says

      January 14, 2013 at 5:52 pm

      Hi Gaby, I have little to no experience with high altitude baking, sorry I can't help you. Roxana
      Reply
  27. Nami | Just One Cookbook says

    January 14, 2013 at 2:56 am

    I first need to do the oven test. Thank you so much for this post. I'm excited to be your student! Very detail and easy to follow post about equipments. I will for sure come back to check when I decide which bread to bake.
    Reply
  28. Averie @ Averie Cooks says

    January 15, 2013 at 12:35 pm

    What a comprehensive and informative post, Roxanne! I dont have a fraction of this stuff for my bread-making but what I wouldn't give. So fun!
    Reply
  29. Karen @ Karen's Kitchen Stories says

    January 17, 2013 at 1:53 pm

    Great post Roxana. I am really fond of using a cast iron Dutch oven (the kind that's reversible that's recommended in Tartine) instead of the clay oven. I've seen set ups with clay flower pots placed over the baking stone to mimic the clay oven you'd like, but I haven't tried that method. Regarding the pizza stone, Emile Henry makes one that is a little different than the usual stone. It's pretty easy to clean and seems pretty sturdy.
    Reply
  30. shivani says

    January 22, 2013 at 1:16 am

    Roxana which brand and size ceramic pans you use
    Reply
  31. Heidi @ Food Doodles says

    January 24, 2013 at 3:15 pm

    Great post! I bake pretty much all our bread and have for years now, but this was still such an informative post. Awesome job! :D
    Reply
  32. jse says

    February 2, 2013 at 3:57 pm

    Wish you had provided photos of each piece of equipment, being new to bread making.
    Reply
  33. Trb says

    April 21, 2013 at 12:32 am

    Great post, thanks! But can you tell me what brand the red ceramic baker is? I've looking for a straight sided one like that! Thanks!
    Reply
    • Roxana says

      April 21, 2013 at 8:33 pm

      Hi Trb, I have those red bread for a couple of years now and can't remember where I got them from and they don't have any name written on the bottom of the pan. Sorry, can't help you. Roxana
      Reply

Leave a Reply Cancel reply

Your email address will not be published. Required fields are marked *

Hi there! I'm Roxana. I have a passion for all things food, a sweet tooth that can’t be tamed and a severe case of the wanderlust. I make midweek meals exciting by sharing approachable recipes, both sweet and savory, that taste completely sinful. Read More →

Popular Posts

  • Carmelitas – caramel chocolate oatmeal bars
  • Blog’n Bake Retreat
  • Red velvet whoopie pies with cream cheese frosting
  • Avocado hummus
  • Romanian Easter bread – Pasca
Copyright © a trEATs affair, All Rights Reserved Unless otherwise stated, all images and content are the sole property of Roxana Yawgel and http://atreatsaffair.com/. No photographs or other content may be used without prior written consent.

Copyright © 2023 · Design Customized by Snixy Kitchen